Follow us:-
0

ESP32 Joystick Controlled Robot Using ESP-NOW Protocol & L298N Motor Driver

  • 30-07-2025

πŸ€– ESP32 Joystick Controlled Robot Using ESP-NOW Protocol & L298N Motor Driver

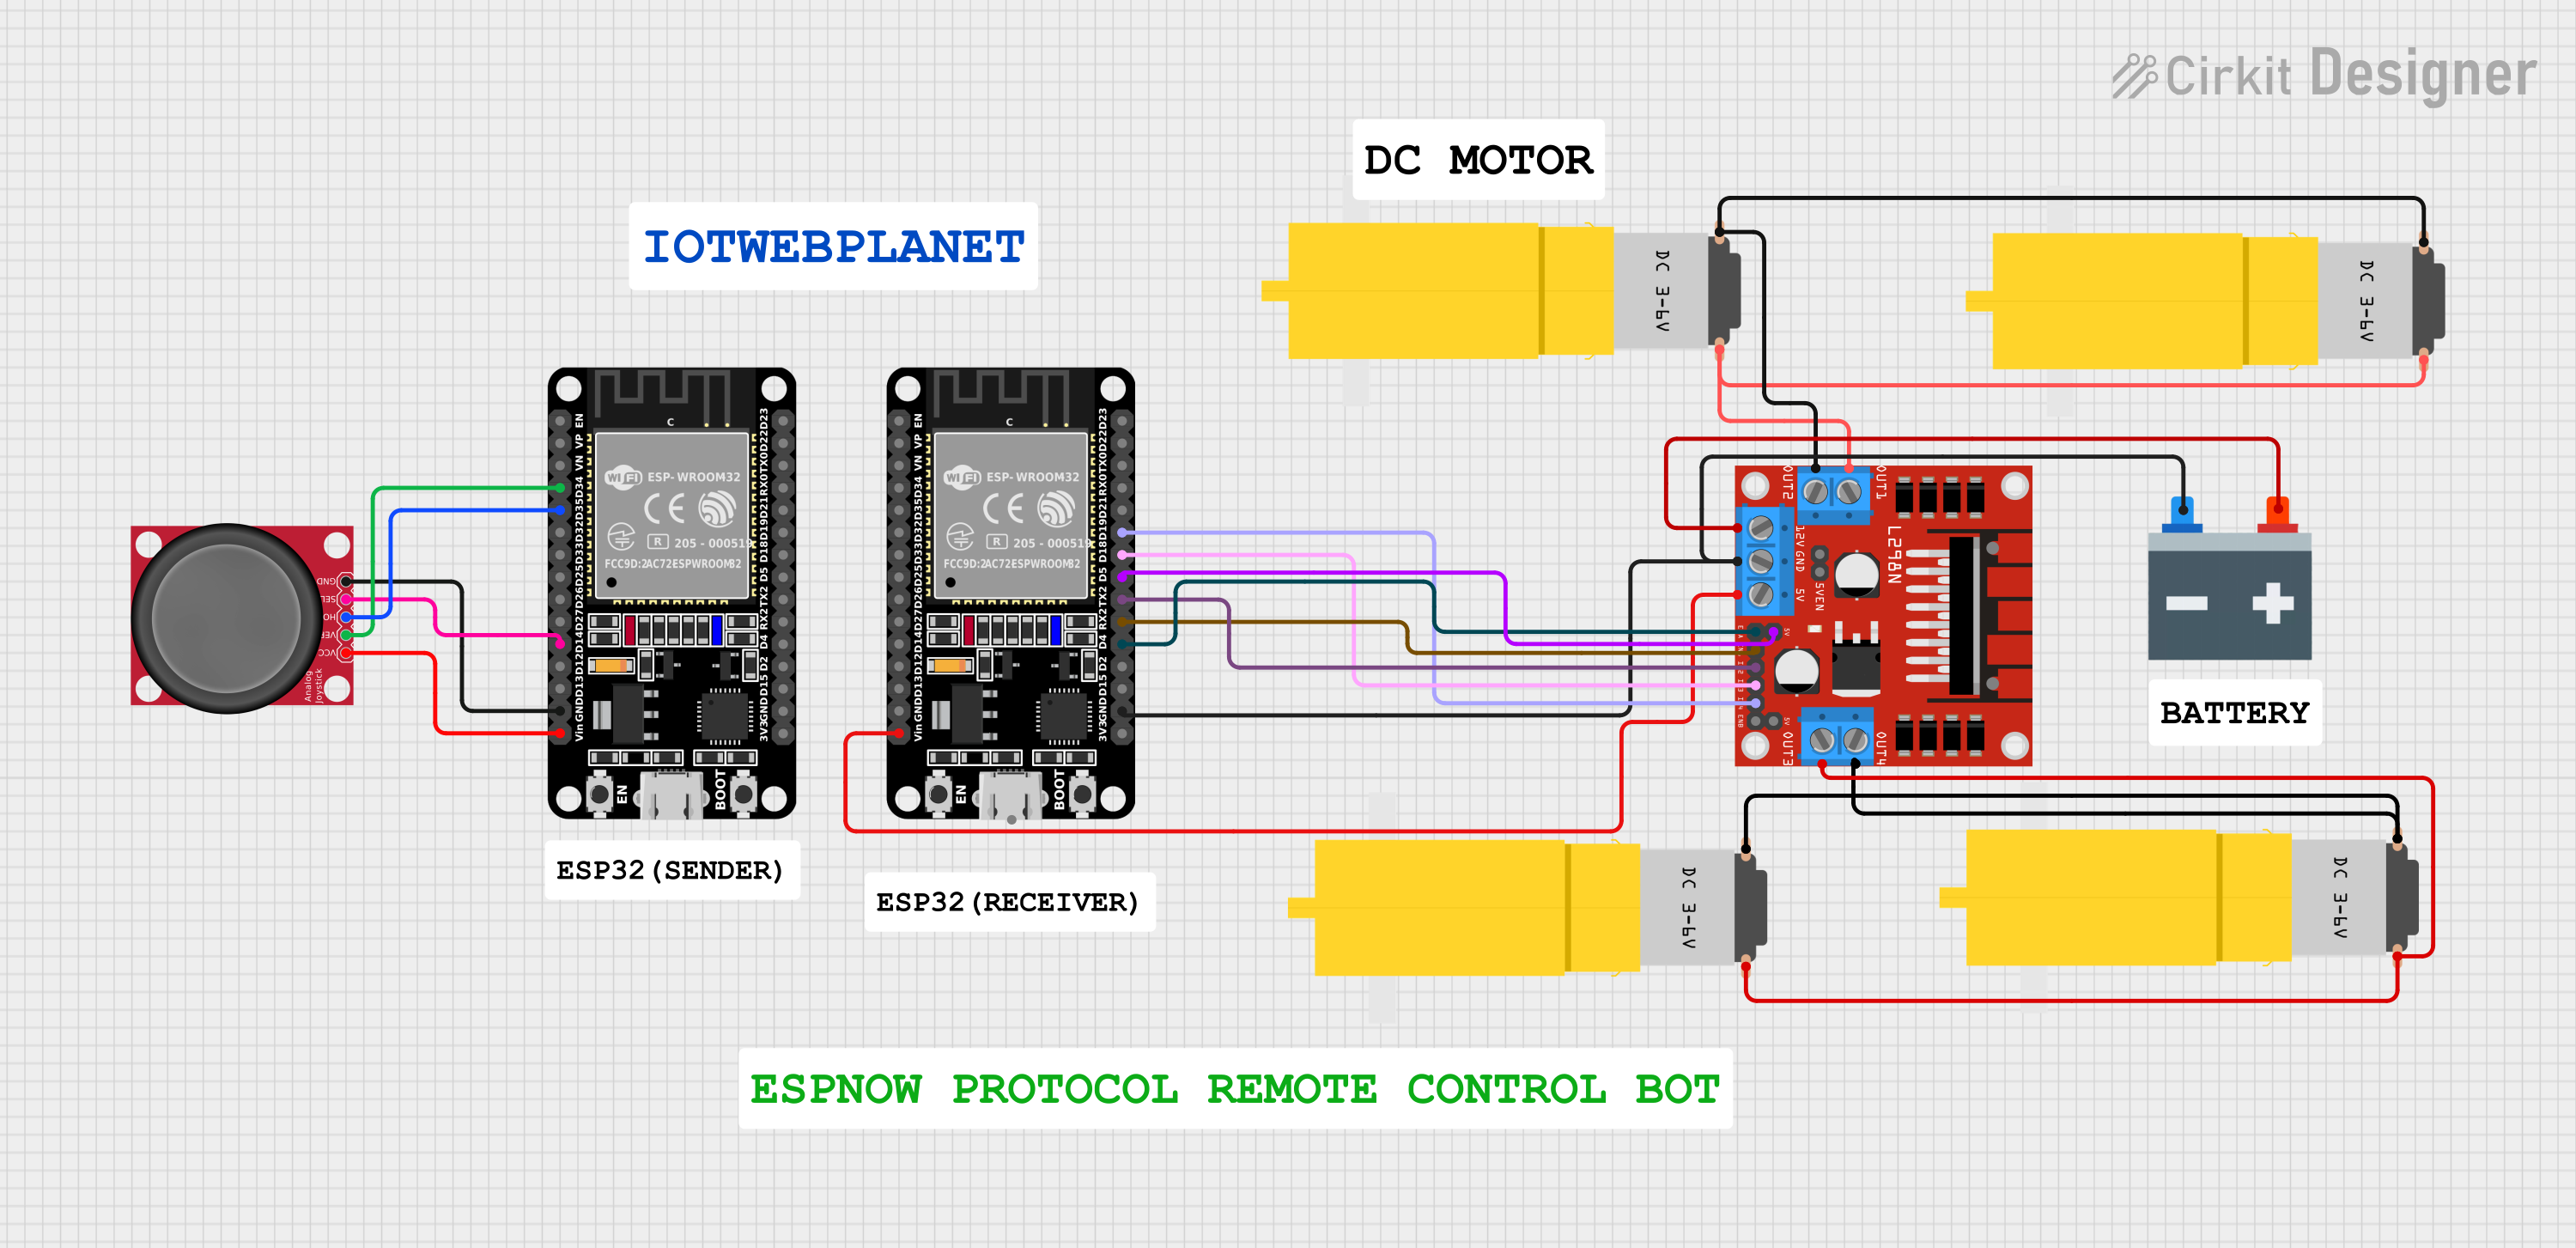
Wireless bot control with speed adjustment via joystick tilt


πŸ“ Introduction

In this project, we built a wireless robot controlled via a joystick and two ESP32 boards using the ESP-NOW communication protocol. Unlike Wi-Fi or Bluetooth, ESP-NOW enables fast, peer-to-peer data transfer between ESP32 devices using MAC addresses, making it ideal for real-time robot control.

The robot’s movement and speed are controlled through analog joystick input, and an L298N motor driver handles motor driving on the receiving end.


πŸ”§ Hardware Used

Component Description
2x ESP32 One for sending joystick data, one for receiving and controlling motors
Joystick Module Outputs analog X/Y values
L298N Motor Driver Dual H-Bridge to drive DC motors
Robot Chassis With 2x DC motors
Jumper Wires + Power Batteries or USB

🧠 How It Works

➀ Communication Setup

  • The sender ESP32 reads the X and Y analog values from a joystick.

  • These values are sent via ESP-NOW protocol to the receiver ESP32.

  • The receiver ESP32 processes the data and controls the L298N motor driver using the L298NX2 library.

  • Speed is adjusted based on how far the joystick is pushed.

➀ Direction Mapping

  • Y-axis forward → robot forward

  • Y-axis backward → robot reverse

  • X-axis left/right → turn accordingly

  • Small movements result in low speed; full push gives max speed.


πŸ“‘ Setting Up ESP-NOW Communication

To communicate using ESP-NOW, both ESP32 boards need to:

  1. Be in WiFi Station mode

  2. Share the receiver’s MAC address

  3. Be added as peers in the ESP-NOW network

Use this code on the receiver ESP32 to get its MAC ad


πŸ› οΈ Wiring Summary

Sender (Joystick to ESP32)

Joystick Pin ESP32 Pin
VRx GPIO 34
VRy GPIO 35
GND GND
VCC 3.3V

Receiver (ESP32 to L298N)

L298N Pin ESP32 Pin
IN1 18
IN2 19
IN3 16
IN4 17
ENA 4 (PWM)
ENB 5 (PWM)

πŸŽ₯ Demo Output

  • Forward push: robot moves ahead

  • Full tilt → max speed

  • Side push: turns left or right

  • Release joystick → bot stops

Tested delay: ~50ms for excellent real-time response


Use this code on the receiver ESP32 to get its MAC ad

/*
  Rui Santos & Sara Santos - Random Nerd Tutorials
  Complete project details at https://RandomNerdTutorials.com/get-change-esp32-esp8266-mac-address-arduino/
  Permission is hereby granted, free of charge, to any person obtaining a copy of this software and associated documentation files.  
  The above copyright notice and this permission notice shall be included in all copies or substantial portions of the Software.
*/
#include <WiFi.h>
#include <esp_wifi.h>

void readMacAddress(){
  uint8_t baseMac[6];
  esp_err_t ret = esp_wifi_get_mac(WIFI_IF_STA, baseMac);
  if (ret == ESP_OK) {
    Serial.printf("%02x:%02x:%02x:%02x:%02x:%02x\n",
                  baseMac[0], baseMac[1], baseMac[2],
                  baseMac[3], baseMac[4], baseMac[5]);
  } else {
    Serial.println("Failed to read MAC address");
  }
}

void setup(){
  Serial.begin(115200);

  WiFi.mode(WIFI_STA);
  WiFi.STA.begin();

  Serial.print("[DEFAULT] ESP32 Board MAC Address: ");
  readMacAddress();
}
 
void loop(){

}

Sender Code (Joystick to ESP32)

#include <esp_now.h>
#include <WiFi.h>

const int xPin = 34;         // VRx
const int yPin = 35;         // VRy
const int buttonPin = 14;    // SW
#define LED 2

uint8_t broadcastAddress[] = {0x30, 0xC6, 0xF7, 0x22, 0xEB, 0xD8};

typedef struct struct_message {
  char a[32];
  int x, y;
  bool button;
} struct_message;

struct_message myData;
esp_now_peer_info_t peerInfo;

bool isConnected = false;
unsigned long lastSendTime = 0;
unsigned long timeoutDuration = 2000; // 2 seconds timeout

void OnDataSent(const uint8_t *mac_addr, esp_now_send_status_t status) {
  if (status == ESP_NOW_SEND_SUCCESS) {
    isConnected = true;
    lastSendTime = millis(); // reset timeout
    Serial.println("βœ… Delivery Success");
  } else {
    Serial.println("❌ Delivery Fail");
  }
}

void setup() {
  Serial.begin(115200);
  pinMode(buttonPin, INPUT_PULLUP);
  pinMode(LED, OUTPUT);

  WiFi.mode(WIFI_STA);

  if (esp_now_init() != ESP_OK) {
    Serial.println("Error initializing ESP-NOW");
    return;
  }

  esp_now_register_send_cb(OnDataSent);

  memcpy(peerInfo.peer_addr, broadcastAddress, 6);
  peerInfo.channel = 0;  
  peerInfo.encrypt = false;

  if (esp_now_add_peer(&peerInfo) != ESP_OK) {
    Serial.println("Failed to add peer");
    return;
  }
}

void loop() {
  int xValue = analogRead(xPin);
  int yValue = analogRead(yPin);
  bool buttonPressed = digitalRead(buttonPin) == LOW;

  int mappedX = map(xValue, 0, 4095, 0, 100);
  int mappedY = map(yValue, 0, 4095, 0, 100);

  myData.x = mappedX;
  myData.y = mappedY;
  myData.button = buttonPressed;
  strcpy(myData.a, "Joystick Data");

  esp_err_t result = esp_now_send(broadcastAddress, (uint8_t *) &myData, sizeof(myData));

  if (result == ESP_OK) {
    Serial.printf("πŸ“€ Sent: X=%d, Y=%d, Btn=%s\n", mappedX, mappedY, buttonPressed ? "Pressed" : "Released");
  } else {
    Serial.println("🚫 Error sending the data");
  }

  // ⚠️ Simulate connection timeout (if no successful sends recently)
  if (millis() - lastSendTime > timeoutDuration) {
    isConnected = false;
  }

  digitalWrite(LED, isConnected ? HIGH : LOW);

  delay(200);
}

Receiver Code (Joystick to ESP32)

#include <L298NX2.h>
#include <esp_now.h>
#include <WiFi.h>

// Motor pins
#define ENA 4
#define IN_1 16
#define IN_2 17
#define ENB 5
#define IN_3 18
#define IN_4 19

#define LED 2
#define TIMEOUT 5000

L298NX2 mybot(ENA, IN_1, IN_2, ENB, IN_3, IN_4);

typedef struct struct_message {
  char a[32];
  int x, y;
  bool button;
} struct_message;

struct_message myData;
unsigned long lastRecvTime = 0;

void OnDataRecv(const uint8_t * mac, const uint8_t *incomingData, int len) {
  memcpy(&myData, incomingData, sizeof(myData));

  Serial.print("Message: "); Serial.println(myData.a);
  Serial.print("Xaxis: "); Serial.println(myData.x);
  Serial.print("Yaxis: "); Serial.println(myData.y);
  Serial.print("Button: "); Serial.println(myData.button ? "Pressed" : "Released");
  Serial.println();

  digitalWrite(LED, HIGH);
  lastRecvTime = millis();

  // Basic Joystick-based Movement
  if (myData.y == 0 && myData.x!=0) {
    mybot.forward();
    Serial.println("Forward");
  }
  else if (myData.y==100 &&  myData.x!=100) {
    mybot.backward();
    Serial.println("Backward");
  }
  else if (myData.x==0 && myData.y!=0) {
    mybot.forwardA();
    mybot.backwardB();
    Serial.println("Left");
  }
  else if (myData.x==100 && myData.y!=100) {
    mybot.forwardB();
    mybot.backwardA();
    Serial.println("Right");
  }
  else {
    mybot.stop();
    Serial.println("Stop");
  }
}

void setup() {
  Serial.begin(115200);
  pinMode(LED, OUTPUT);
  digitalWrite(LED, LOW);

  WiFi.mode(WIFI_STA);

  if (esp_now_init() != ESP_OK) {
    Serial.println("Error initializing ESP-NOW");
    return;
  }

  esp_now_register_recv_cb(esp_now_recv_cb_t(OnDataRecv));

  mybot.setSpeed(100);
  mybot.stop(); // Ensure motors are off on start
}

void loop() {
  if (millis() - lastRecvTime > TIMEOUT) {
    digitalWrite(LED, LOW);
    mybot.stop(); // stop bot if no data received
  }
}

ESP32 Joystick Controlled Robot Using ESP-NOW Protocol & L298N Motor Driver

Related Post

How do I run a script at Pico on boot?

How do I run a script at Pico on boot?

As per official documentation Step by step process for pico program run after power on:Save your pyt...

ESP32 Setup in Arduino IDE

ESP32 Setup in Arduino IDE

ESP32 Board are so popular? Mainly because of the following featuresLow-costBluetoothWiFiLow PowerDu...

Node MCU ESP8266 Setup in Arduino IDE

Node MCU ESP8266 Setup in Arduino IDE

Node MCU ESP8266 Board are so popular? Mainly because of the following features.Its true Arduino Kil...

ESP32 with L298N DC Motor Driver

ESP32 with L298N DC Motor Driver

πŸ”§ Basic IntroductionL298N is a dual H-Bridge motor driver IC that allows controlling the direction...

MotorBot with Esp32

MotorBot with Esp32

πŸ”§ Components Needed:ComponentQuantityESP32 Dev Board1L298N Motor Driver Module1DC Gear Motors (TT o...

ESP32 with ADXL335 Accelerometer

ESP32 with ADXL335 Accelerometer

The ADXL335 is a small, thin, low-power 3-axis analog accelerometer manufactured by Analog Devices....

ESP32 with Ultrasonic Sensor (HC-SR04)

ESP32 with Ultrasonic Sensor (HC-SR04)

🧠 What is an Ultrasonic Sensor?An ultrasonic sensor is a device that uses sound waves to detect how...

ESP32 with DHT11 Temperature & Humidity Sensor

ESP32 with DHT11 Temperature & Humidity Sensor

πŸ“Œ What is the DHT11 Sensor?The DHT11 is a basic, low-cost digital temperature and humidity sensor....

ESP32-Based Autonomous Fire Extinguisher Bot

ESP32-Based Autonomous Fire Extinguisher Bot

πŸ”₯ FIRE BOT – Bluetooth Controlled Fire Extinguisher RobotWelcome to the FIRE BOT project! This robo...

ESP32 with BMP180 Pressure & Temperature Sensor

ESP32 with BMP180 Pressure & Temperature Sensor

BMP180 Sensor: Digital Barometric Pressure SensorThe BMP180 is a digital barometric pressure sensor...

ESP32 with 1.8" TFT LCD Display (ST7735S)

ESP32 with 1.8" TFT LCD Display (ST7735S)

πŸ”§ 1. Hardware Overview: 1.8" TFT DisplayMost 1.8" TFT modules are based on the ST7735 driver and co...

Smart Display Interface Using SSD1306 OLED & ESP32

Smart Display Interface Using SSD1306 OLED & ESP32

The SSD1306 is a popular controller used in OLED (Organic Light Emitting Diode) displays, most commo...

ESP32 with Servo Motor

ESP32 with Servo Motor

A servo motor is a type of motor designed for precise control of angular position, making it ideal f...

ESP32 with Gravity Voice Recognition Module

ESP32 with Gravity Voice Recognition Module

The Gravity Voice Recognition Module is a user-friendly module developed by DFRobot that allows micr...

ESP32 with APDS-9960 Gesture Sensor

ESP32 with APDS-9960 Gesture Sensor

The APDS-9960 is an advanced, compact sensor from Broadcom (formerly Avago Technologies) that offers...

Smart Control: Stepper Motor with ESP32

Smart Control: Stepper Motor with ESP32

πŸ” What is the 28BYJ-48 Stepper Motor?The 28BYJ-48 is a 5V unipolar stepper motor with a built-in re...

Smart Farming : ESP32 with Soil Moisture Sensor

Smart Farming : ESP32 with Soil Moisture Sensor

How Soil Moisture Sensor Works and Interface it with Esp32Β When you hear the term β€œsmart garden,” on...

Control in Your Hands: ESP32 with 2-Axis Joystick

Control in Your Hands: ESP32 with 2-Axis Joystick

πŸ”§ What is an Analog Joystick?An analog joystick typically has:2 potentiometers (one for X-axis, one...

ESP32 with NEO-8M GPS Module

ESP32 with NEO-8M GPS Module

πŸ“‘ What is the NEO-8M GPS Module?The NEO-8M is a high-precision GNSS GPS receiver by u-blox, capable...

ESP32 with WS2812 NeoPixel LED

ESP32 with WS2812 NeoPixel LED

πŸ”§ What is a NeoPixel?NeoPixel is Adafruit’s name for individually addressable RGB LEDs using the WS...

Motion Detected: ESP32 with PIR Sensor (HC-SR501)

Motion Detected: ESP32 with PIR Sensor (HC-SR501)

🧠 What is a PIR Sensor?PIR = Passive Infrared SensorA PIR sensor detects motion by measuring change...

ESP32 with AI Thinker GP-02 GPS Module

ESP32 with AI Thinker GP-02 GPS Module

βœ… What is AI Thinker GP-02?The AI Thinker GP-02 is a GNSS (GPS) module, designed to work with satel...

ESP32 with SIM900A GSM Module

ESP32 with SIM900A GSM Module

πŸ“‘ What is SIM900?The SIM900 is a GSM/GPRS module from SIMCom. It allows microcontrollers like ESP32...

Button with ESP32

Button with ESP32

🧠 What is a Push Button?A push button is a simple mechanical switch that connects two points in a c...

Tilt Sensor Module SW520D

Tilt Sensor Module SW520D

πŸ€” What is a Tilt Sensor?A tilt sensor (also called a ball switch or mercury switch) is a digital sw...

ESP32 with TCS34725 RGB Sensor

ESP32 with TCS34725 RGB Sensor

🎨 What is the TCS34725?The TCS34725 is a color sensor made by AMS (now part of Renesas).It detects...

ESP32 + I2C LCD for Real-Time Feedback

ESP32 + I2C LCD for Real-Time Feedback

πŸ“˜ What is an I2C LCD?An I2C LCD is a Liquid Crystal Display that uses the I2C communication protoco...

MPU6050 Accelerometer and Gyroscope Sensor

MPU6050 Accelerometer and Gyroscope Sensor

🧠 What is MPU6050?The MPU6050 is a 6-axis motion tracking device made by InvenSense. It combines:βœ…...

Digital Temperature Monitoring: ESP32 + DS18B20 Sensor System

Digital Temperature Monitoring: ESP32 + DS18B20 Sensor System

🌑️ What is DS18B20?The DS18B20 is a digital temperature sensor from Maxim Integrated (now Analog Dev...

ESP32 with DS1307 RTC Module

ESP32 with DS1307 RTC Module

⏰ What is DS1307 RTC?The DS1307 is a real-time clock IC by Maxim Integrated that keeps track of:Sec...

DFPlayer Mini with Esp32

DFPlayer Mini with Esp32

🎡 What is DFPlayer Mini?The DFPlayer Mini is a tiny, standalone MP3 audio player module. It can pla...

IR Receiver VS1838B with ESP32

IR Receiver VS1838B with ESP32

πŸ“‘ What is an IR Receiver?An IR (Infrared) Receiver module receives signals from an IR remote contro...

Rotary Encoder with Esp32

Rotary Encoder with Esp32

πŸ“Œ What is a Rotary Encoder?A rotary encoder is an electro-mechanical sensor that converts the angul...

ESP32 with Dot Matrix Display (MAX7219)

ESP32 with Dot Matrix Display (MAX7219)

πŸ“Œ What is the Dot Matrix Display with MAX7219?A Dot Matrix Display is an arrangement of LEDs in a g...

ESP-NOW with ESP32

ESP-NOW with ESP32

πŸ“Œ What is ESP-NOW?ESP-NOW is a wireless communication protocol developed by Espressif, allowing ESP...

ESP32 with MAX30100 HEART SENSOR

ESP32 with MAX30100 HEART SENSOR

❀️ Heart Rate & SpOβ‚‚ Sensor (MAX30100/MAX30102)πŸ”¬ Pulse Sensor | SpOβ‚‚ Monitor | Wearable Health Tech...